
Made this for a dear friend for their first con! Hope you enjoy the pattern!
Crochet Amethyst Whip
Materials list
- Worsted weight yarn in black, dark gray, purple, and white
- Stuffing
- yarn needle for sewing
- F hook
- G hook
- pins for pinning pieces on/ together
- scissors
- dowel rod, I used a 7/8 inch wide by 8.5 inches long one, you can use whatever size you like though, it's not critical
- The ability to braid or someone willing to braid for you (standard three strand braid)
- Scotch guard or waterproof suede boot spray (optional, more info in assembly section)
- Spray starch (optional, see star section)
The following pattern was written and designed by me and is copyrighted. You may not sell or reproduce this pattern in any way. Do not claim this pattern as your own design. You may not transmit or distribute this pattern by any means. You may not sell this pattern. You may not sell what you make from this pattern. Please respect this, I spent a very long time designing this pattern, there is a great deal of effort and love put into this. Thank you very much for your understanding.
This pattern may use any the following techniques/abbreviations:
Sc- single crochet
inc- increase
dec- decrease, particularly you should use the invisible decrease if you know how to do it
sc in each sc or work even- put one stitch into each stitch from the previous row, don't add any increases or decreases
R- round or row
Ch- chain
hdc- half double crochet
Trpl- triple crochet
# sc or sc #- for example 5 sc or sc 5 both mean to crochet in the next 5 sc, with one single crochet in each.
Repeat (*)- repeat what is between the asterisks * until you come to the end of the round, unless otherwise indicated
ring- magic ring. If you cannot do this technique then you may substitute this: ch 2 and sc however many were supposed to go in the ring into the second ch. However this will leave a small hole in the piece, this is why the magic ring is preferred, it leaves no visible hole. Many tutorials on how to do the magic ring are available online.
The numbers in parenthesis at the end of each row are the number of stitches you should have when that row is done. Mark the start of each round with a marker and move this marker as you complete rows/rounds.
IMPORTANT NOTE!
All pieces (unless otherwise indicated) are worked with TWO strands of yarn together. You may do this by taking the strand on the outside of the skien and the one which comes from the inside of the skien together. Crochet with two strands the same way you would crochet if you had only one, hold them both together as you crochet.
Handle (make using dowel rod, dark gray yarn, and G hook, 2 strands of yarn held together as one)
Round1- 6 sc in ring (6)
R2- *sc, inc* (9)
R3- *sc 2, inc* (12)
R4-? sc in each sc (12)
Keep crocheting until the dowel is almost all the way covered. Don't crochet on the dowel rod just pull it onto it to check then pull it back off and continue crocheting. Once you reach the end of the dowel you will have to pull the crocheted tube onto it and do the following:
* 2 sc, dec* (9) then *sc, dec* (6) then dec as much as you can to close up. Before you finish off make sure you don't have too many rows or the tube covering the dowel rod will slide around and look weird, play around with it and add and remove rows as needed. Finish off and weave in your ends. If your dowel rod is a different width than mine you may need less increase rows (ie only need 9 stitches instead of 12). Do a few rows and make sure it fits on the dowel rod snugly before continuing.
Gems at end of whip (make 9 of these pieces with F hook and 1 strand of purple)
These are worked in rows, each gem is made of 3 pieces sewn together. Ch1 and turn at the end of each row.
Row1- ch2, sc in 2nd ch from hook (1)
R2- inc (2)
R3- inc, sc (3)
R4- inc, sc rest(4)
R5- inc, sc rest (5)
R6- sc in each sc (5)
R7-sc in back loops only (5)
R8- dec, sc in rest (4)
R9- dec, sc in rest (3)
R10- dec, sc in rest (2)
R11- dec (1)
Now sc evenly around the outside, finish off, leave long tail for sewing. Take three of these pieces and sew the long ends together to make 3d diamond shape. Leave one end open (to fit the tip of the whip inside) and sew the tips together on the other end. Stuff each gem and set aside.
Main part of whip (make with 2 strands of black yarn and G hook)
There is no real pattern for this part, simply make a chain a little more than twice as long as you want the whip to be. Now sc in each chain until the end and finish off, leave a tail for sewing. Make three of these long strips total. Sew the ends with all the tails together securely and braid the three strands together. When you get near the end you can just knot the ends together or sew them together and leave the three strips free at the end. Make sure you braid fairly tightly, it's helpful if someone holds the end for you or you can tape it to a table or put it under a heavy book.
Pommel for handle (make 4 of these pieces with G hook, 2 strands of purple yarn)
Worked in rows, ch1 and turn at the end of each row.
Row 1- ch6, sc in 2nd ch from hook and each after (5)
R2- inc, sc in rest (6)
R3- inc, sc in rest (7)
R4- inc, sc in rest (8)
R5- sc in back loops only, sc in rest (8)
R6- dec, sc in each sc (7)
R7- dec, sc in in rest (6)
R8- dec, sc, sc, dec (4)
R9- dec, sc, sc (3)
R10- dec, sc (2)
R11- dec (1)
Finish off, leave long tail to sew parts together later. When you have all four done sew the long edges together to make a 3d diamond shape but leave the top open (sew together all the row 11's and the row 1s will all be at the top of the gem making a squarish opening). Try to make the rows with the back loops only crochet match up (row 5).
Now join your crochet yarn anywhere along the open top (the row 1 of any individual piece/side). Sc around and put one dec in each side of the gem so that you dec 4 times total as you go around. Then repeat this again: sc in each sc but put one dec in each side of the gem so that you decrease another four times (you will now have decreased the top opening by 8 stitches total). The pommel should now fit snugly over the handle of the whip. Be sure to stuff the pommel as well.
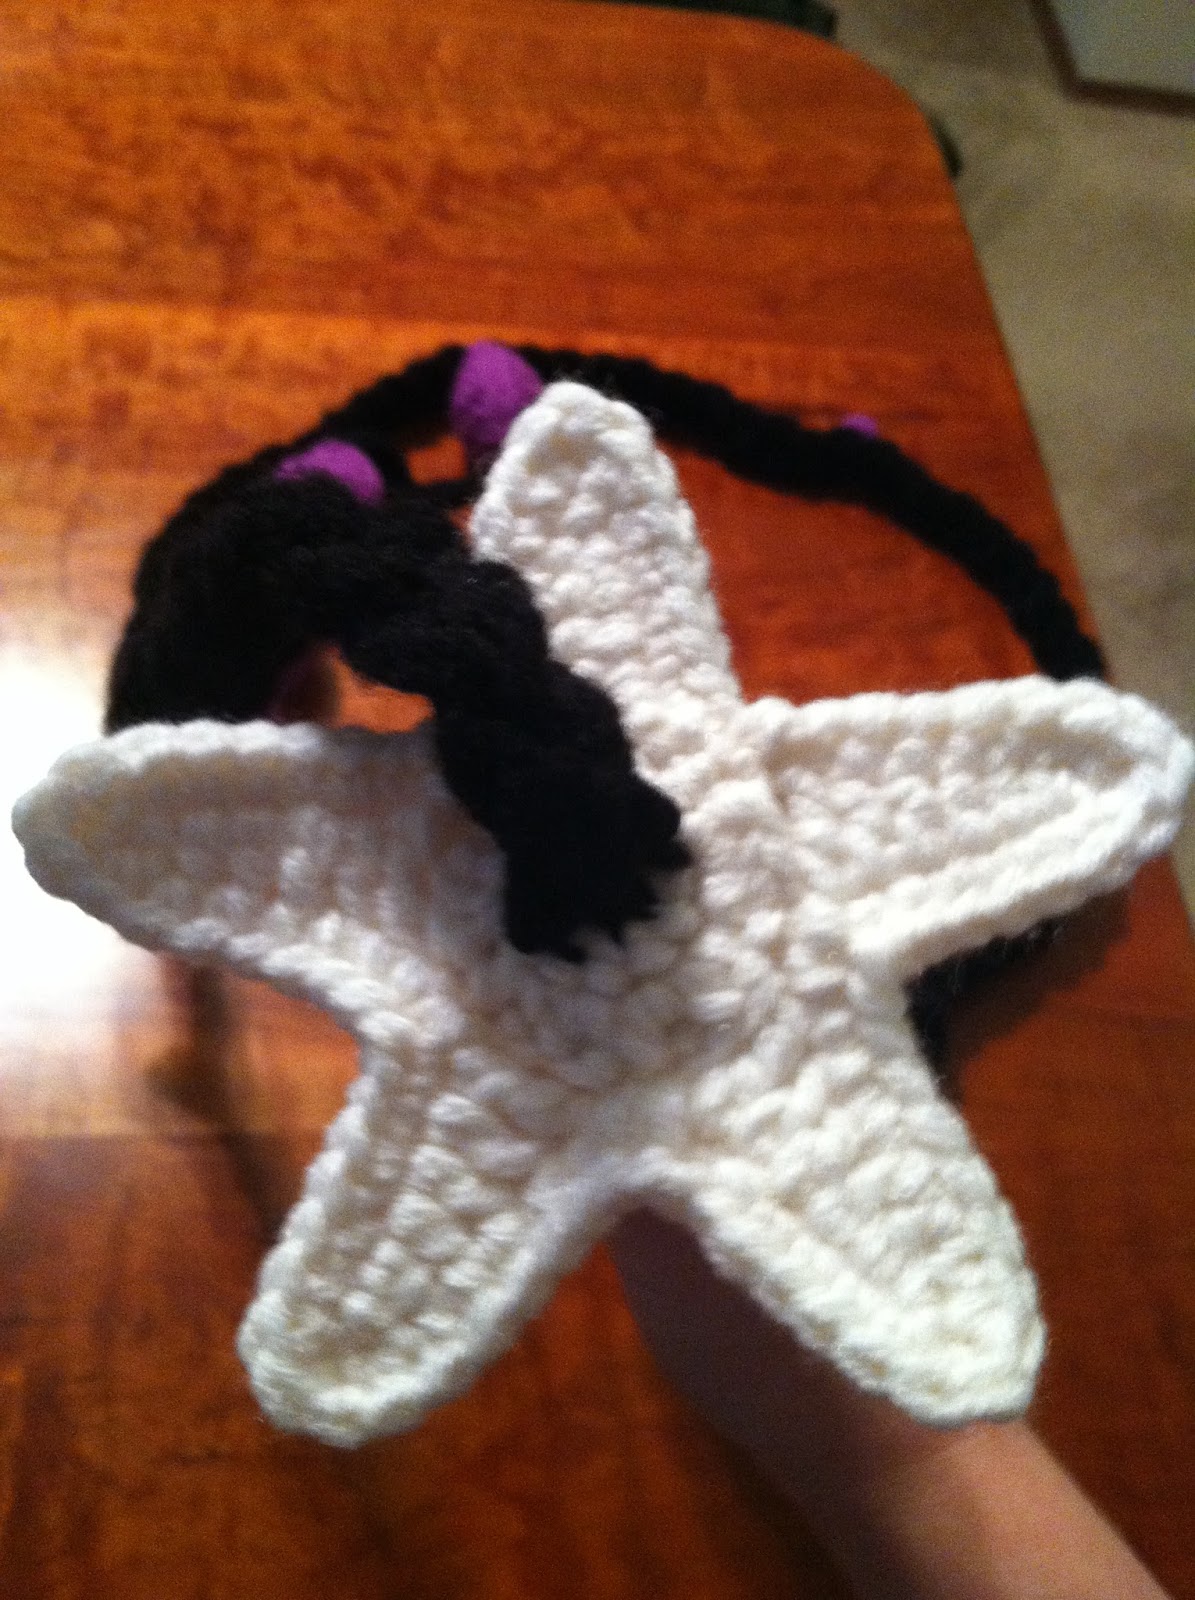
Star (make 1 with 2 strands of white yarn and G hook)
Round1- 10hdc in ring (10)
Round2- inc all (20 hdc)
Making points: ch 8, slp stitch in 2nd ch from hook, sc, hdc, hdc, dc, dc, trpl, skip two stitches and slp stitch to join to circle, slp stitch in next stitch and repeat all. (make 5 points)
Sc all around the outside to soften the sharpness of the star. You may need to put 3 stitches into the points to curve around nicely. Finish off, leave long tail for sewing. You can spray the star with starch and pin it to cardboard to prevent rolling of the points. Not necessary but helpful.
Spikes for on the main part of the whip (make 5 of these with G hook and 2 strands of purple yarn)
Round 1- 5 sc in ring (5)
R2- inc, sc in rest (6)
Finish off, no need to stuff these.
Assembly
- Braid strands of whip together if you have not already (refer to that section for more info)
- Sew star onto handle at one end then sew the main part of the whip over top onto the middle of the star, be sure to get your needle through both the star and the part covering the handle for maximum sturdiness. Be sure it's on there really well!
- Insert each of the free tips of the whip into one of the three small gems. Sew the tops of the gems shut, being sure to catch/sew through the whip part and secure them on there very well.
- Insert the other end of the handle a little ways into the open end of the pommel, sew the pommel onto the handle.
- Sew the small spikes onto the whip wherever you like, try to keep your yarn hidden and don't go all the way through. Hide the free ends of the yarn inside the hollow part of the spikes.
- spray the whip with scotch guard or similar spray. I used this suede boot protector that I had lying around (got it from Target in the shoe section). This step is optional but will make it water and dirt resistant.
-
Go fight evil!


WOW! This is so cool! I love it!
ReplyDeleteNew pattern, yay!
P.S. I was thinking of designing a Greninja crochet pattern (first time trying to make my own pattern) I am very determined to make Greninja because there are no patterns for him, thanks for the tips on crocheting, the article is amazing!
Thanks so much!
DeleteGood luck on your Greninja pattern, that pokemon has such a neat design! I'm so glad my tips were able to help you!
Your welcome and thanks!
ReplyDelete