

Woah! The wild Helioptile you stepped on attacked!
I told myself if I was going to make this one I was going to make the ears open and close, I'm pretty happy with how it turned out! This isn't too hard of a pattern despite the ears looking crazy, they are made in segments then sewn together so it's not bad at all. All the other parts are pretty basic so this might be good for a beginner looking for a bit of a challenge. If you have any questions or find any mistakes please let me know, enjoy!
(C) Kim Novak 2014
The following pattern was written and designed by me and is copyrighted. You may not sell or reproduce this pattern in any way. Do not claim this pattern or plush as your own design. You may not transmit or distribute this pattern by any means. You may not sell this pattern. You may not sell what you make from this pattern. Please respect this, I spent a very long time designing this plush and pattern, there is a great deal of effort and love put into this. Thank you very much for your understanding.
Read pattern carefully before starting, particularly the instructions at the beginning of the pattern. There are also many tips throughout the pattern that will help you when making different pieces, be sure to read those too!
Materials: (Note that yarn amounts are estimates, you might need more or less depending on how you crochet)
* light yellow worsted weight yarn (I used Red Heart brand 'Cornmeal', you will need around 2 skeins)
*Dark gray worsted weight yarn (I used Red Heart brand 'Charcoal', you will need around 1 skein)
* Small amounts of light blue, white, and black worsted weight yarn
*Large yarn needle for sewing pieces together
*Fiberfill/stuffing
*A chopstick or similar object is helpful when stuffing small objects, not required
*G hook and F hook
*Straight pins for pinning pieces on before sewing them on
*Optional: beans, rice, or plastic beads & pantyhose (for weight, more info after body pattern)
*Optional: small metal snaps to keep ears closed, preferably black in color (note these were not used in the plush shown)
Note: there is no gauge for this pattern. The only thing that is important is that you have a tight stitch when crocheting so that no stuffing will show through the finished pieces. If you use the recommended hooks it should be fine but if you are someone who crochets more loosely you may want to reduce the hook size accordingly.
This pattern is worked in rounds (unless otherwise noted) and uses the following techniques/abbreviations:
Sc- single crochet
inc- increase
dec- decrease, particularly you should use the invisible decrease if you know how to do it
sc in each sc or work even- single crochet in each single crochet, don't add any increases or decreases
R- round or row
Ch- chain
hdc- half double crochet
# sc or sc #- for example 5 sc or sc 5 both mean to crochet in the next 5 sc, with one single crochet in each.
Repeat (*)- repeat what is between the asterisks * until you come to the end of the round, unless otherwise indicated
ring- magic ring. If you cannot do this technique then you may substitute this: ch 2 and sc however many were supposed to go in the ring into the second ch. However this will leave a small hole in the piece, this is why the magic ring is preferred, it leaves no visible hole. Many tutorials on how to do the magic ring are available online.
The numbers in parenthesis at the end of each row are the number of stitches you should have when that row is done. Mark the start of each round with a marker and move this marker as you complete rows/rounds.
IMPORTANT NOTE!
All pieces (unless otherwise indicated) are worked with TWO strands of yarn together. You may do this by taking the strand on the outside of the skien and the one which comes from the inside of the skien together. Crochet with two strands the same way you would crochet if you had only one, hold them both together as you crochet. This will yield a bigger plush faster and with less effort than crocheting with only one strand. This pattern has not been tested for only one strand and pieces such as the eyes would need to be adjusted for size on your own.
All pieces are made with G hook and TWO STRANDS of yarn unless otherwise indicated.
Body (Make 1 with 2 strands of yarn and G hook in yellow yarn)
Stuff as you go but stuff the neck particularly firmly so it can support the head. If you want to make a weighted plush take the bottom/foot part of a stocking and fill it with dry beans, rice, or doll pellets (available at most craft stores and online, they're little white plastic pellets). Tie off the stocking and put the weight inside the plush in the bottom before stuffing it the rest of the way. Be sure to put it in before you start decreasing or it might not fit! Weighting the plush will help it not fall over since the head is so big and heavy because of the ears.
R1- 6sc in ring
R2- inc in each sc (12)
R3- *sc, inc * (18)
R4- *2sc, inc* (24)
R5- *3 sc, inc* (30)
R6- *4sc, inc* (36)
R7- *5sc, inc* (42)
R8-17- sc in each sc (42)
R18- *10 sc, dec* sc in last 6 sc (39)
R19-20- sc in each sc (39)
R21- *8 sc, dec* sc in last 9 sc (36)
R22- *6sc, dec* sc in last 4 sc (32)
R23- sc in each sc (32)
R24-*4 sc, dec* sc last 8 sc (28)
R25- *4sc, dec* sc in last 4 sc (24)
R26- *3 sc, dec* 2sc, dec in last 2 (19)
R27-32- sc in each sc (19)
Finish off, leave tail for sewing head on later.
Head (Make 1 with G hook and 2 strands of yarn, start with gray)
R1- 6sc in ring
R2- inc in each sc (12)
R3- *sc, inc * (18)
R4- *2sc, inc* (24)
R5- *3 sc, inc* (30)
R6- *4sc, inc* (36)
R7- *5sc, inc* (42)
R8- *6sc, inc* (48)
R9- *7sc, inc* (54)
R10- *8sc, inc* (60)
R11-15- sc in each sc (60) change to yellow at end of round 15
R16-22- sc in each sc (60)
R23- *8sc, dec* (54)
R24-*7sc, dec* (48)
R25- *6sc, dec* (42)
R26- *5 sc, dec* (36)
R27- *4sc, dec* (30)
R28- *3sc, dec* (24) Start stuffing if you haven't already
R29- *2 sc, dec* (18)
R30- *1 sc, dec* (12)
R31- dec around to close up, finish stuffing before you close, sew shut and weave in end
Arms (make 2 with 2 strands of yellow and G hook)
Stuff as you go.
R1-4 sc in ring (4)
R2- *inc* (8)
R3- *3sc, inc* (10)
R4-18-sc in each sc
Finish stuffing. Squeeze opening shut and crochet or sew across to close flat. Leave long tail for sewing.
Tail (Make 1 with G hook and starting with gray)
Stuff pretty firmly as you go. If you stuff it firmly you can gently curve the tail with your hands when it's done.
R1- 5sc in ring (5)
R2- inc, sc rest (6)
R3- sc 3, inc, sc 2 (7)
R4- inc, sc 3, inc , sc 2 (9)
R5- sc in each sc (9)
R6- sc 4, inc, sc 4 (10)
R7- sc, inc, sc 8 (11)
R8- sc in each sc (11)
R9- two increases evenly spaced, sc in all others (13)
R10- one increase evenly spaced, sc in all others (14)
R11- sc in each sc (14)
R12- one increase evenly spaced, sc in all others (15) change to yellow
R13- two increases evenly spaced, sc in all others (17)
R14- one increase evenly spaced, sc in all others (18)
R15- sc in each sc (18)
R16- two increases evenly spaced, sc in all others (20)
R17-21- sc in each sc (20)
R22-one increase evenly spaced, sc in all others (21)
R23-25- sc in each sc (21)
R26- one increase evenly spaced, sc in all others (22)
R27-29-sc in each sc (22)
Finish stuffing and finish off, leave long tail for sewing on later.
Legs (make 2 with yellow yarn, 2 strands, and G hook)
Stuff as you go but stuff these lightly so they are somewhat flat, see pictures.
R1- 6 sc in ring (6)
R2- *inc* (12)
R3- *3sc, inc* (15)
R4- *4sc, inc* (18)
R5- *5sc, inc* (21)
R6-10- sc in each sc (21)
R11- *5sc, dec* (18)
R12- *4sc, dec* (15)
R13- *3sc, dec* (12)
R14- *2sc, dec* (9)
R15- *1 sc, dec* (6)
Finish off, sew opening closed.
Ears (make 6 of these (or only 2 if you do not want ears to open), starting with Yellow yarn, 2 strands, G hook)
*There are special instructions for sewing the ears so that they open in the assembly section. If you do not want the ears to open then just make 2 of these and sew them on for the normal 'closed' ears.
*As you crochet these hide your yarn tails within the yellow triangle part of the ear since this part is hollow, this way the ears will look cleaner with no messy tails.
For the tip of the ear spread the increases out evenly within the round and from round to round so they are not all bunched up in one place.
Ear Tip (if it doesn't look pointy try turning it inside out when you're done)
Round1- 4sc in ring (4)
R2- 2 increases spread out evenly, sc in rest (6)
R3- 2 increases spread out evenly, sc in rest (8)
R4- 2 increases spread out evenly, sc in rest (10)
R5- 2 increases spread out evenly, sc in rest (12)
R6- 2 increases spread out evenly, sc in rest (14)
Finish off.
Squeeze the opening shut so the ear tip part looks like a triangle. You will be crocheting through both layers of the flat side of the ear tip to make the black part of the ear.
Row1- with gray yarn attach it along flat part of ear tip and crochet across, crocheting through both layers of the ear tip. Sc 7, ch 1 and turn (7)
R2-3- sc in each sc, ch 1 and turn (7)
R4- dec, sc in rest, ch 1 and turn (6)
R5- sc in each sc (6)
R6- sc to end, dec across last 2, ch 1 and turn (5)
R7-8sc in each sc,ch 1 and turn (5)
R9- 3 sc, dec, ch 1 and turn (4)
R10-13- sc in each sc, ch 1 and turn (4)
R14- 2 sc, dec, ch 1 and turn (3)
R15-19- sc in each sc, ch 1 and turn (4)
R20- dec, sc, ch 1 and turn (2)
R21- 2 sc, ch 1 and turn (2)
Finish off, leaving long tail. See assembly instructions for how to sew segments together.
Feet (make 2 in gray, G hook, 2 strands)
We will start out making a half circle for the heel part of the foot.
R1- 3 sc in ring, pull ring shut into half circle shape, ch 1 and turn (3) Working in rows now.
R2- *inc*, ch 1 and turn(6) Now we will make the flat part of the foot.
R3- sc 5 across flat part of half circle (5)
R4- sc in each sc (5)
R5- making the toes, the pattern for the actual toe is what is in parenthesis, each toe is made up of 3 stitches and then slip stitched to back onto row 4 to join it : (Ch 4, sc in 2nd ch from hook, hdc, hdc, slp stitch to join to sc at base), slp stitch over to next stitch, slp stitch again over to next stitch, (Ch 4, sc in 2nd ch from hook, hdc, hdc, slp stitch to join to sc at base), slp stitch over to next stitch, slp stitch again over to next stitch (Ch 4, sc in 2nd ch from hook, hdc, hdc, slp stitch to join to sc at base). You should now have 3 toes.
Hands (Make 2 in gray with F hook and 1 strand)
Worked in rows.
R1- Ch 6, sc 5, ch 1 and turn (5)
R2- sc in each sc, ch 1 and turn (5) Now we will make the fingers in the same sort of way we made the toes.
R3- (ch 4, slp stitch in 2nd ch from hook, sc, sc, slp stitch to base to join), slp stitch in next sc, slp stitch in next sc again, (ch 4, slp stitch in 2nd ch from hook, sc, sc, slp stitch to base to join), slp stitch in next sc, slp stitch in next sc again, (ch 4, slp stitch in 2nd ch from hook, sc, sc, slp stitch to base to join). You should have 3 fingers now.
Eyes (F hook, 1 strand, blue yarn, make 2)
These could also be made out of felt if you like.
The eyes are worked in rounds around a foundation chain. when you get to the end of the chain you will just keep crocheting around to the other side like you were crocheting around a circle.
R1- ch 8, inc in 2nd ch from hook, sc 5, put 3 sc in ch at end, now work around the other side crocheting into the 'backs' of the chain. sc 5, put another sc in the first ch so that now it will have 3 total. (16 sc total)
R2- inc, sc 6, inc, inc, inc, sc 4, inc, inc (22)
R3-sc, inc, sc 7, inc, sc, inc, sc, inc, sc 5, inc, sc, inc (28)
Slip stitch into the next stitch to smooth it out a little. Finish off, leave long tail for sewing.
Face triangles (make 4 of these, 3 for the back of the head and one for the forehead, use yellow yarn, 1 strand, F hook)
Worked in rows.
R1- ch 12, sc in 2nd ch from hook and each after, ch 1 and turn (11)
R2- dec, sc 9, ch 1 and turn (10)
R3- dec, sc 8, ch 1 and turn (9)
R4- dec, sc 7, ch 1 and turn (8)
R5- dec, sc 4, dec, ch 1 and turn (6)
R6- dec, sc 2, dec, ch 1 and turn (4)
R7- dec, dec,ch 1 and turn (2)
R8- dec (1)
Finish off, leave long tail for sewing on later.
White part around side of eye
See pictures of finished eyes to help you with this part. You might have to try it a few times to get both eyes even, since the eyes are mirrors of each other you have to start each eye in a different place or else you would be crocheting on the back of the eye.
Right eye (The plush's right, not your right):
Take white yarn and join it in the outside side of the eye (the part of the eye closest to the right ear), almost at the top. slip stitch 10 times, sc 6 times, slip stitch 2 times and finish off.
Left eye (the plush's left, not your left):
Take white yarn and join it in the bottom of the eye on the inside side of the eye (the part closest to the face triangle), almost at the bottom but not quite. Slip stitch 2 times, sc 6 times, slip stitch 10 times, finish off.
Pupil (make 2 in white with F hook and 1 strand)
We will be working in the round around the foundation chain again.
R1- ch 4, inc in 2nd ch from hook, sc, put 3 sc in ch at end, working around other side now: sc, put another sc in the first/top ch so that it now has 3. Slip stitch into the next stitch to make it smooth. finish off, leave tail for sewing.
Assembly and Pictures
- Sew head to body, before sewing head on completely put more stuffing in the neck to make it as stiff as possible to support the large head.
- Sew tail to body
- Sew feet to legs
- sew legs to body. Use a separate piece of yarn to sew it to the body, the whole thing doesn't have to be sewed on, I just did along the top and about 3/4 down and around, leaving the thinner 'ankle' part free.
- sew arms to body
- sew hands to arms
- sew ear segments together: sew them in an accordion style, see pictures for more help. They will fold more easily if you place one segment on top of the other then sew along the one side (rather than laying them side by side and sewing them together this way). If you want to sew snaps on the ears to keep them closed you can. You will need two snaps for each ear. (not done in pictured plush)
- sew ears to head: sew only the top segment edge to the head. Just sew those two stitches to the head and let the rest of the ear hang free, this is what lets it fold up and also hang down when it's closed. See pictures for more help.
- sew forehead triangle in middle of face so you can place the eyes right next to it, to help with spacing of eyes
- sew pupil to eyes then sew eyes on
- Sew triangles to back of head, position middle triangle first so the other two will be evenly spaced
- embroider mouth and nose with black yarn
 |
| Back view with ears folded up |
 |
| How the ear attaches, note that it's only sewn on across the end of the top ear segment, just sewn on over 2 stitches, the bottom is left free so it can fold up |
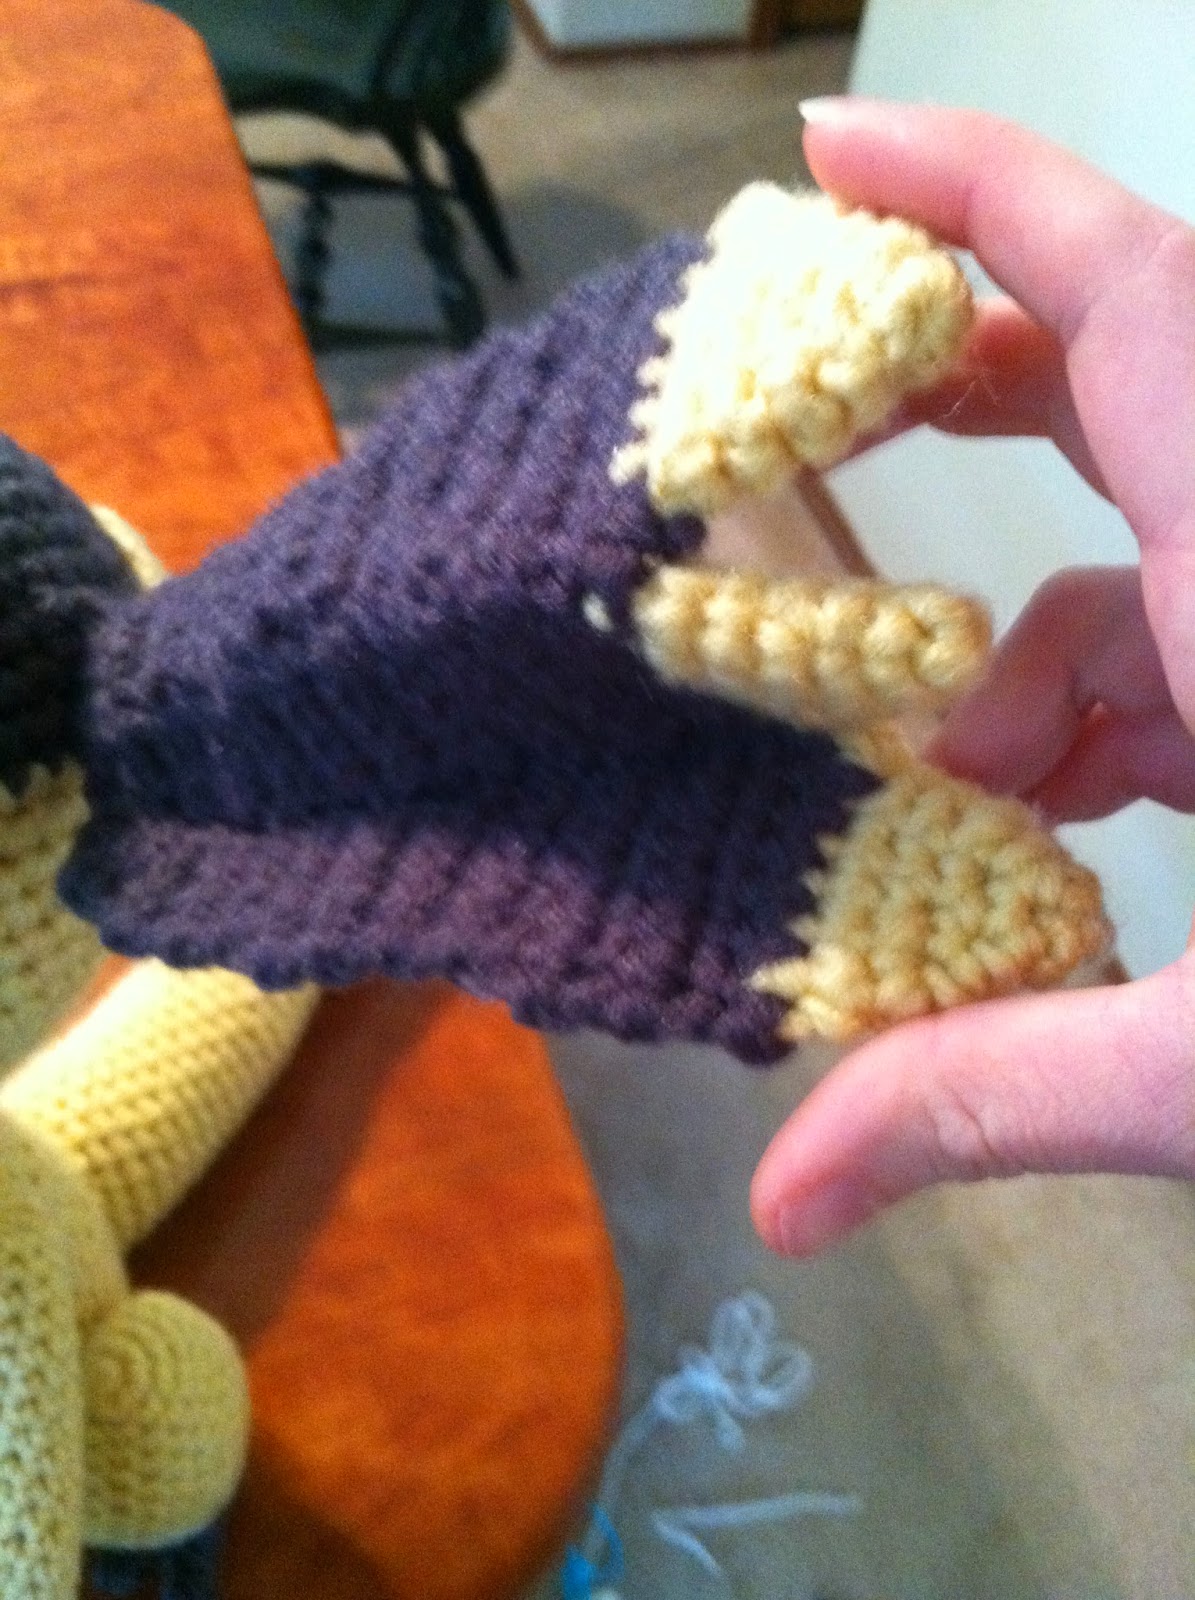 |
| Trying to show how the ear folds |


 |
| Side of ear to show folding, it's an accordion shape/fold, here it looks like a backwards Z |
Soooo cute can't wait to buy some yarn to make him! XD
ReplyDeleteSo glad you like him! Let me know if you have questions or need more pictures or anything! ^_^
ReplyDeleteI love this one it is so cute! I would definitely have her as a pet!
DeleteAww cute!
ReplyDeleteBy the way why don't you write exactly where the increases and decreases are? Just a question.
DeletePlease excuse me I had a better look at one and i see now you did write exactly me sorry!
DeleteDammit! don't have enough yellow yarn! or black for that matter. grrr I wanna make this soon!
ReplyDeleteIs this one life sized?
DeleteI'd say pretty close! It's about a foot tall and to me it seems about the size it was in the show
Deleteawesome! Love your work!
DeleteThanks so much! ^_^
DeleteI love this!
ReplyDeleteThank you! Helioptile is such a cutie!
Deleteyou know whats funny? You said she was about a foot tall. She is only 4 inches from being life size!
DeleteT
Awesome! Glad I judged the size about right! ^_^
DeleteWhat would happen if you used three strands?! That would be huge!
ReplyDeleteT
It'd be giant! Once I made wolfdreamer's snorlax with four strands, it went from being palm sized to over a foot tall! Super big and fat and cuddly!
DeleteCOOOOOOOL! Imagine how big it could be if you could do 10 STRANDS It would be absolutely HUMONGOUS! Maybe when I get more black yarn I could try 2 or 3 strands to make her life size! I almost always thing Helioptile is a girl.
DeleteT
i mean helioptile life size. Imagine a life size snorlax! It wouldn't even fit on your bed and imagine how much stuffing he would take! He would eat through so many bags! LOL!
Deletelol do they even make a hook big enough for 10 strands, that would be crazy! I imagine you'd get tangled up quite a lot! 4 was super hard for me to control so I can't imagine more >_<
DeleteHelioptile does have kind of a girly look with it's ears right? They sort of look like the ends of candy wrappers when they open, very cute!
If you crocheted a life size snorlax you could use it for a bed! And yeah you'd need soooo much stuffing! I've always wanted a snorlax beanbag chair or something like that :3
DeleteI know right? Who wouldn't want a snorlax beanbag? He is kinda adorable in his own funny way!
Deletebtw it is a great idea to make helioptiles ears foldable!
Can I use black for the ears?
ReplyDeleteYes, please feel free to use whatever colors you like! You could even make him shiny colors if you wanted ^_^ have fun!
Delete